Zero trust is a set of best practices and controls that organizations need to adapt across their IT environment. By default, CloudHub 2.0 allows all traffic from private space to destinations outside private space. To secure your CloudHub 2.0 deployments, you should configure the VPC-level firewall rules to allow traffic to and from specified IP addresses and ports. You can fine-tune the ingress and egress of your application traffic with the firewall rules.
Now, you can control egress traffic at the application level independent of the VPC-level firewall rules in CloudHub 2.0. You can restrict apps running in your CloudHub 2.0 Private Space to connect to specific destinations only. This provides a higher level of security for your applications and makes it easy to manage outbound access to SaaS vendors that only have dynamic IPs.
Understanding app-level egress rules
With app-level egress rules, you can restrict connection to only allowed resources. For example, you can restrict any app running in your private space on CloudHub 2.0 to connect only to your Salesforce instance by allowing app-level traffic only to <my domain>.my.salesforce.com domain. You can do this by creating a default egress rule that restricts any egress from your application. Then, define a Rule Group that allows egress to only allowed domains.
This will enhance security and prevent accidental or intentional connections outside of your permitted domains. Rule Groups are scoped to applications. You can centrally create multiple Rule Groups based on different application policies and select the one needed in the application firewall rules configuration.
To use app-level egress control, you must:
- Create a private space in CloudHub 2.0 and provisioned the private network
- Configure VPC-level firewall rules to allow network level egress and ingress
- Enable app-level rules
For this content, we assume you have CloudHub Network Admin permissions. Only users with network admin permissions can set up private spaces and configure firewall rules.
What are private spaces?
A private space is a virtual, private, and isolated logical space in CloudHub 2.0 to run your apps. You can create multiple private spaces, either in the same or different regions. You connect your private intranet to your private space to function as a single, private network. In each private space, you define:
- A private network, which is a virtual cloud where apps deployed to this private space run
- One or more connections from the private network to your external network, either via Anypoint VPN or a transit gateway
- TLS contexts, which define the domains that are available when deploying apps to the private spaces, and optionally enable mutual TLS
- Firewall rules to allow and block inbound and outbound traffic to your private space
- The environments and business groups to allow deployment to the private space
When you create a private space, your license for Mule runtime is automatically injected and managed by MuleSoft.
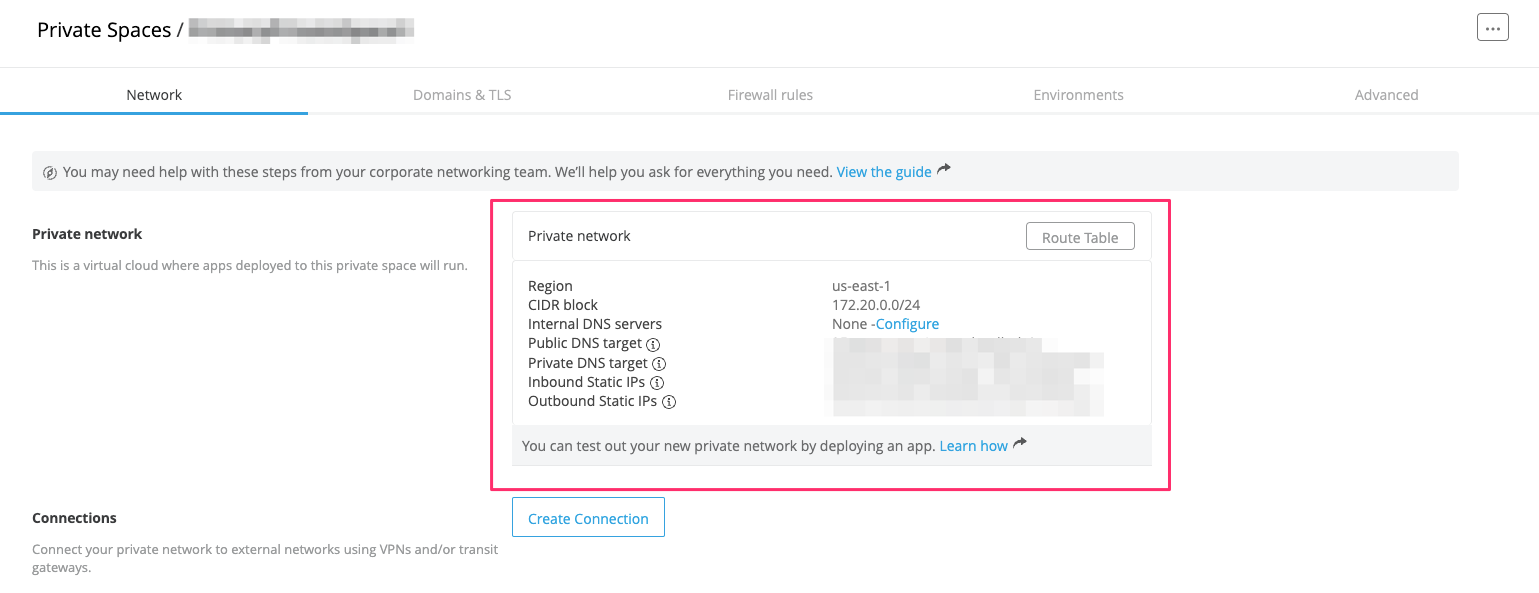
Set up a private space
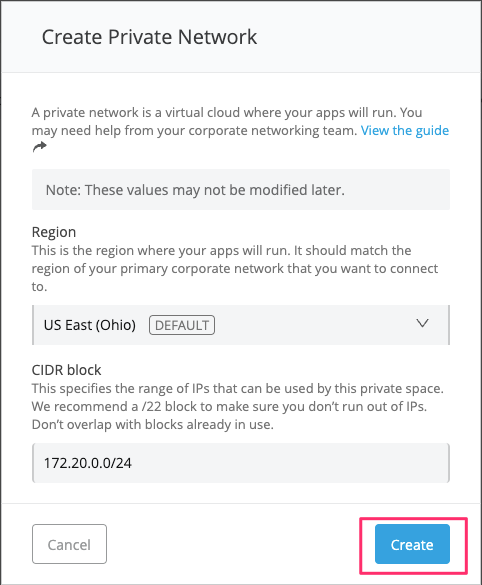
Before setting up your private space, you should decide on the size of your network by selecting your IP address range. The CIDR block is the range of IPv4 addresses, in Classless Inter-Domain Routing (CIDR) notation that the apps deployed in your private space use. The CIDR block defines the size of the private space. For this explanation, we will use 172.20.0.0/24.
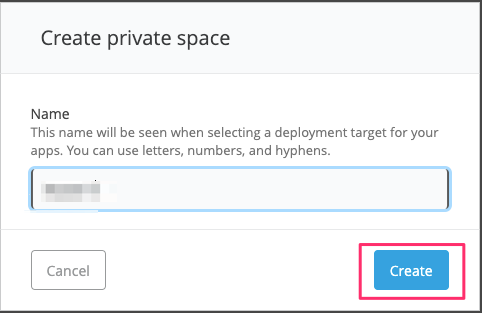
- Log in to Anypoint Platform, go to Runtime Manager, and then click on Private Spaces
- Click Create private space
- Provide a name for your private space, then click Create
Before you can deploy apps to your private space, you’ll need to create a private network
- Click on Create Private Network
- Choose region
- Provide CIDR block
- Click Create
From there, you will have a private space, and it will take up to 30 minutes to create a private space network.
Set up firewall rules
- Next, click on the Firewall Rules tab
- Here you can define ingress and egress network rules, which will apply to your private space
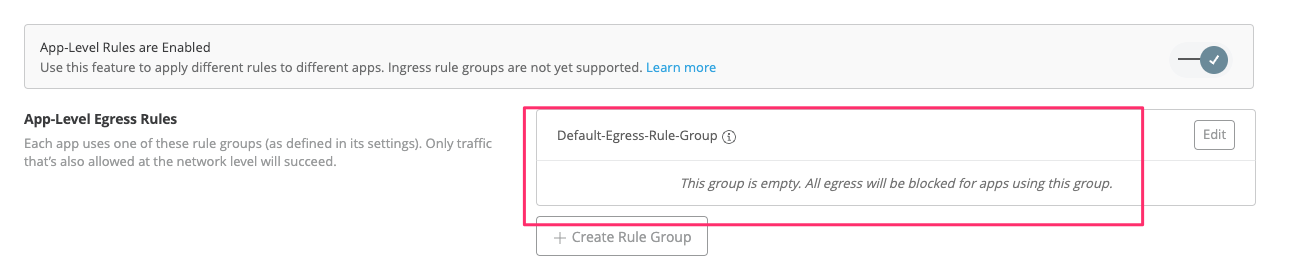
- Then, enable app-level rules
- Edit Default-Egress-Rule-Group
- Delete the egress rule that says “Allow any protocol to 0.0.0.0/0”
- Click Update Egress Rules
- Note: Deleting the rule will make the default egress blocking all outbound connections.
- Edit Default-Egress-Rule-Group again
- Create an egress rule to allow access to any protocol and to any destination
- Click Update Egress Rules
Deploy the application
- Deploy an application that connects to a resource (e.g. connecting to a Salesforce org) using runtime manager
- Enter the relevant information in the runtime tab
- Click on the Firewall Rules tab
- Select Default-Egress-Rule-Group and that it allows all protocol connection anywhere on all ports
- Click on Deploy Application

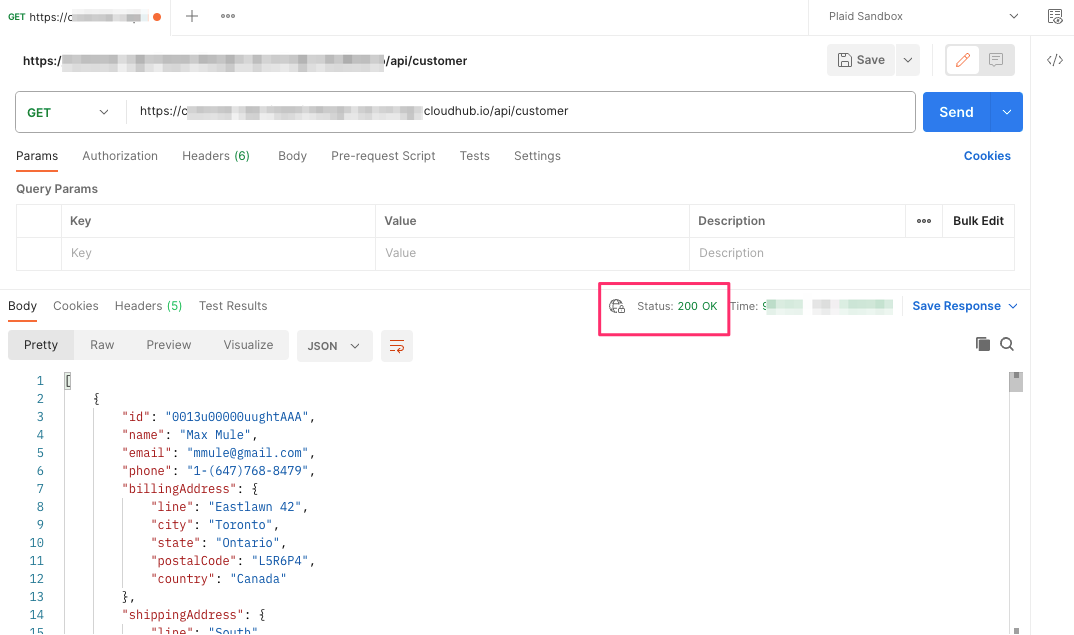
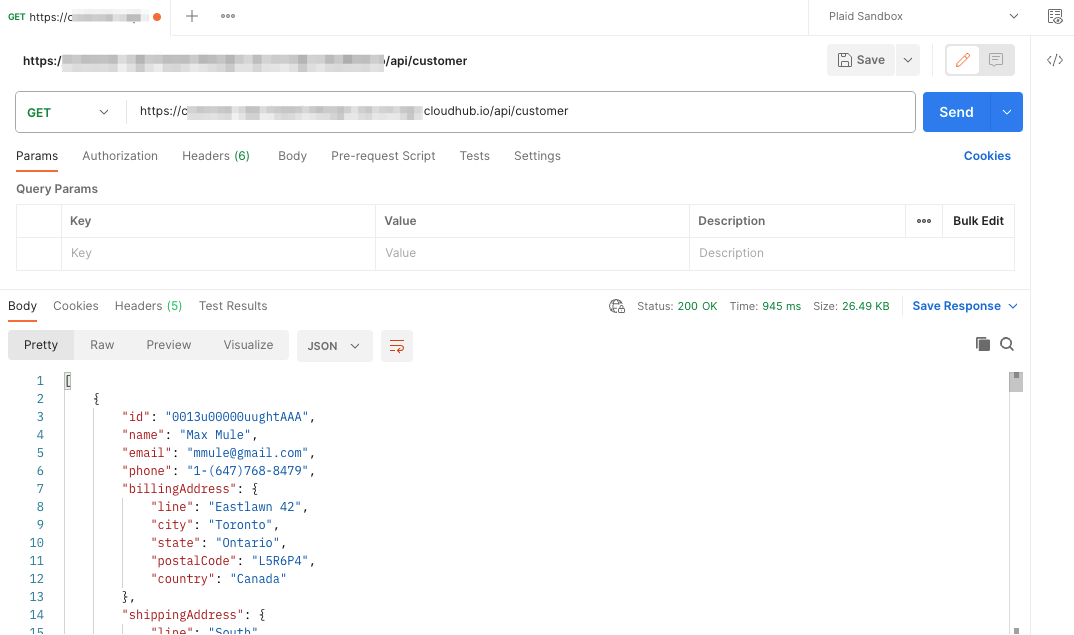
This will deploy the application in your private space on CloudHub 2.0. While it’s deploying, you can see the progress in the logs. Once the application deployment is finished, test it using your preferred API testing workspace. You should get a successful response from the API you just deployed. Make sure that it connects to an external source to get data from. Then, verify that you get status as 200 OK.
Update firewall rules
- Go back to the runtime manager and click on Private Spaces, then edit it
- Next, click on Firewall Rules
- Edit the Default-Egress-Rule-Group
- Delete the egress rule
- Select Update Egress Rules
- The Default-Egress-Rule-Group should be updated to blocking all egress
Test your application
- Test your API again
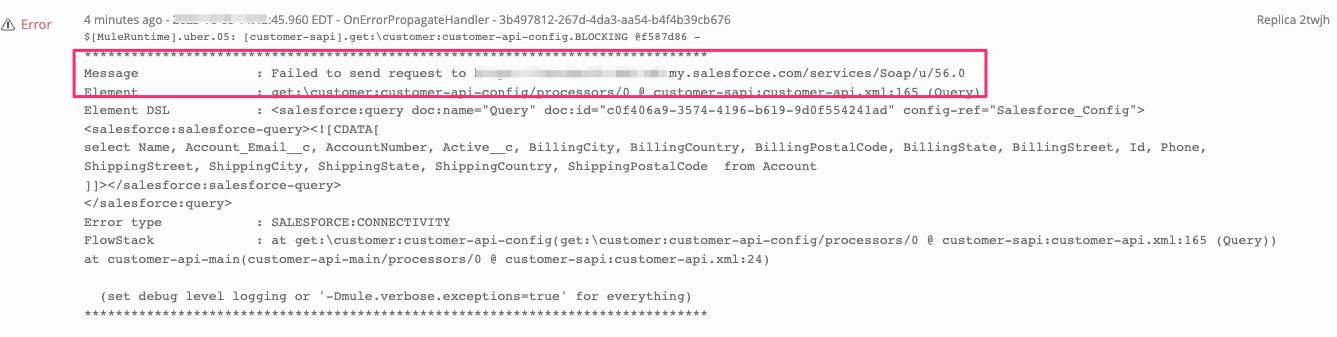
- This time the status should be 500 Server Error, which occurs because the API now is blocked from reaching salesforce.com
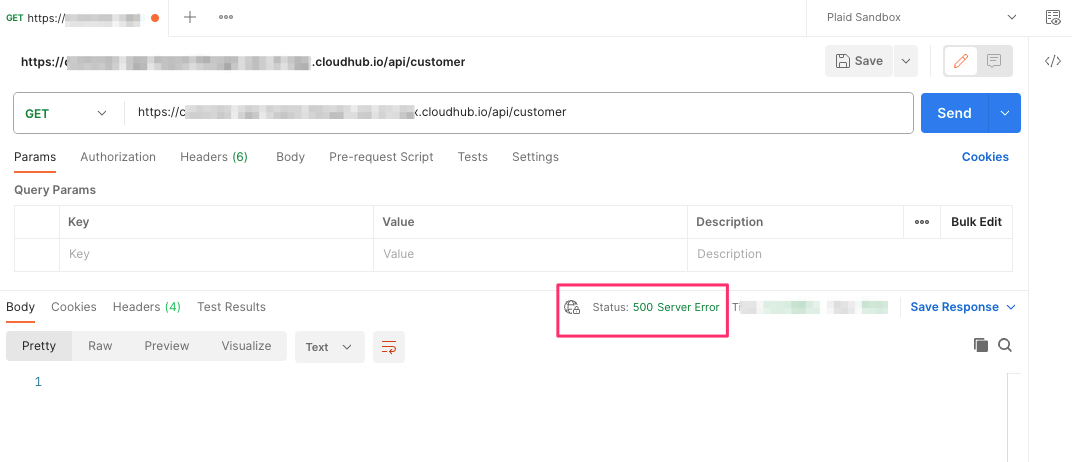
- To verify, go to the logs for your application
- You should see the error: “Failed to send request to https://<mydomain>.my.salesforce.com”
- Go back to the runtime manager and select the application you deployed; then select Manage Application
Create a Firewall Rule Group
- Now add a new rule to allow egress only to your Salesforce domain
- Go back to runtime manager and choose Private Spaces, click on it, and edit it
- Click on Firewall Rules and add a new egress rule group by selecting Create Rule Group
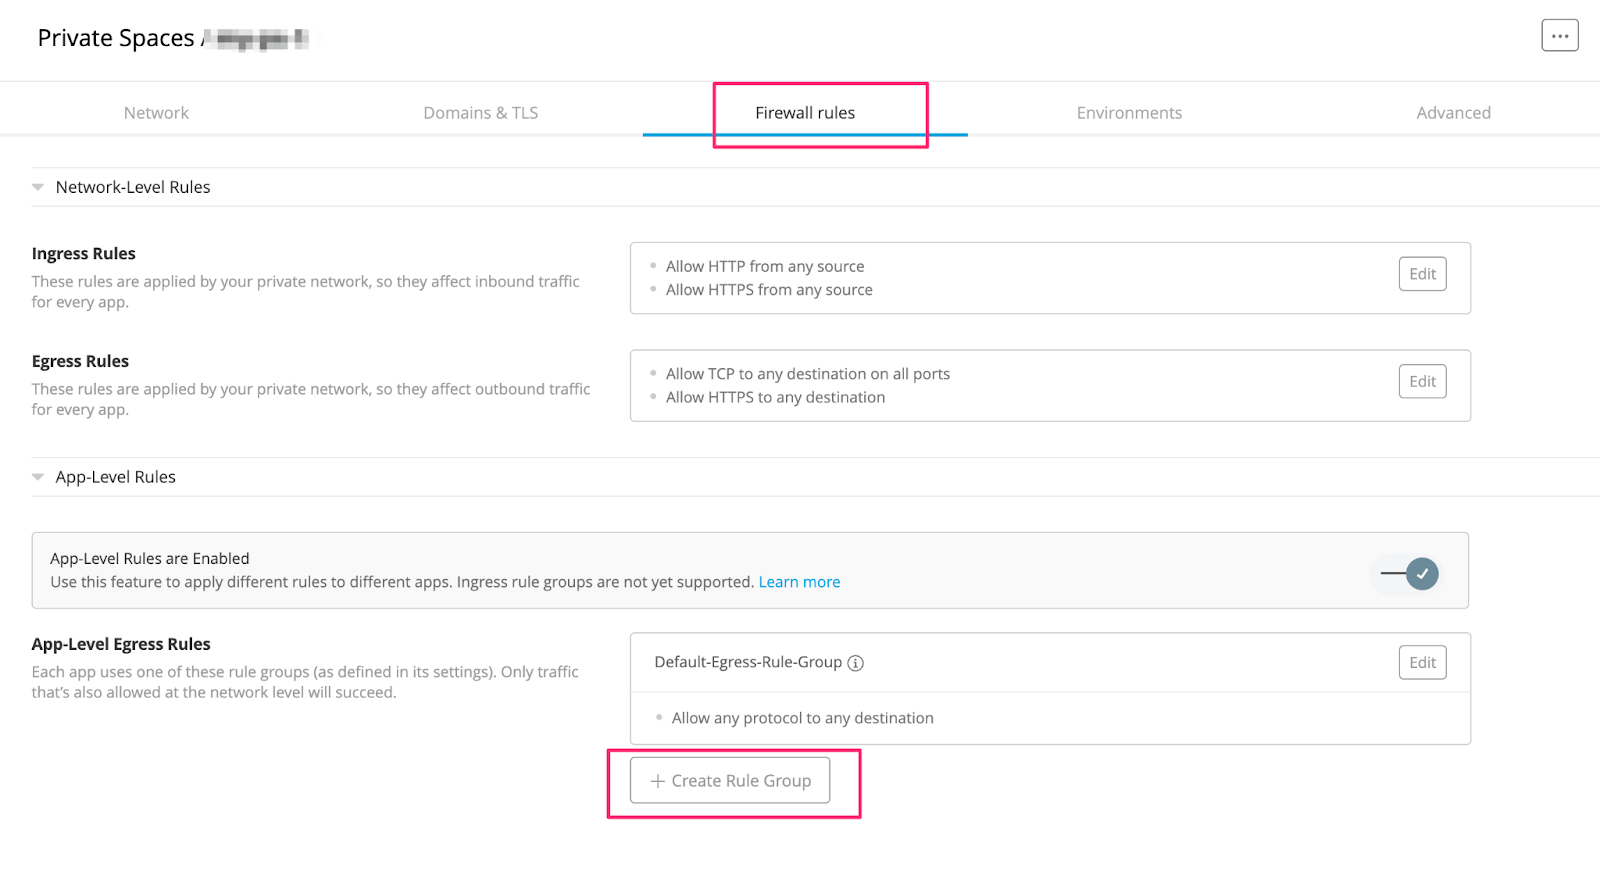
- Provide a Group Name, and then click on Add Rule
- For Protocol, select HTTPS
- For Destination, select Custom Domains
- Add your custom domain in the destination
- Then, click on Create Egress Rules
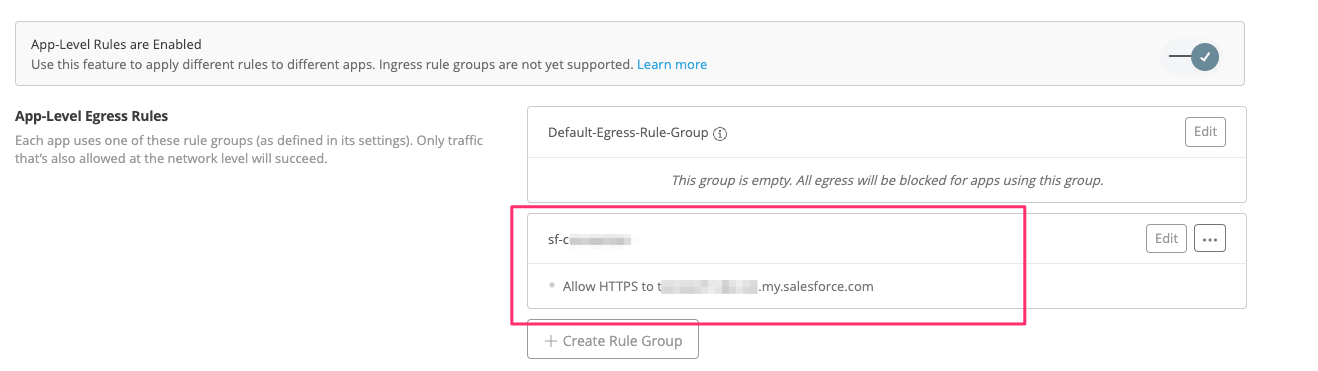
- You should see a new Rule Group, allowing connection to your specific domain
Update the application to use the new Rule Group
Now, let’s make our application use the new Rule Group:
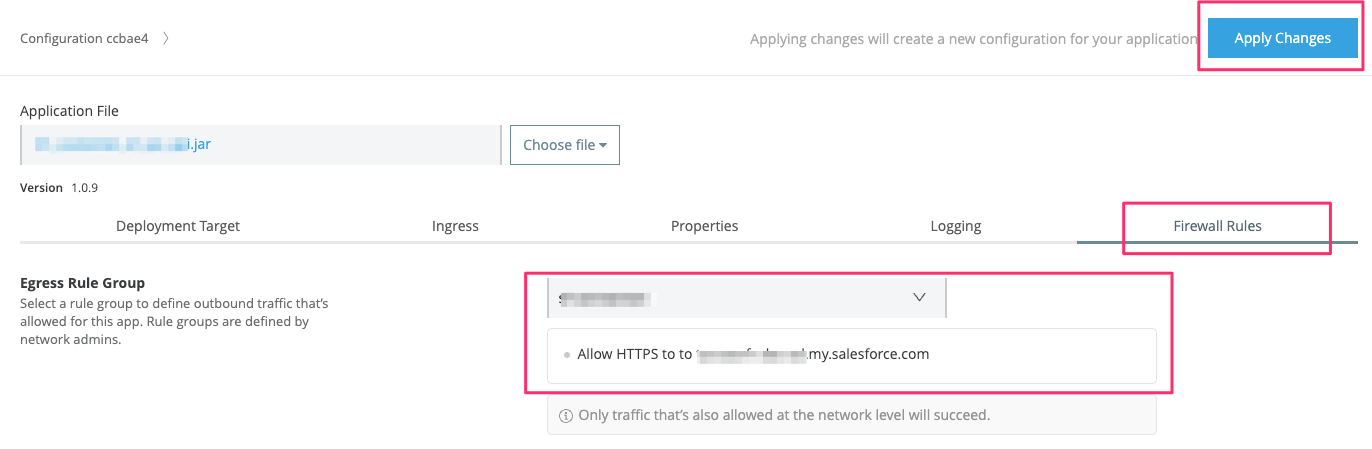
- Go back to Runtime Manager, select the application, and click on Manage Application
- Select Firewall Rule
- Choose the new Rule Group that you created that allows egress to your Salesforce domain
- Click on Apply Changes to update your application deployment
Test your application
- Test your application again
- This time, you should get a response back from Salesforce, ensuring the connection was allowed to your specific Salesforce instance
App Egress Control for applications using Anypoint MQ or Object Store
If you’re setting up connections to Anypoint MQ or OSv2 and trying to access them from apps running on Cloud Hub 2.0, you need to allow traffic to connect to Anypoint MQ and OSv2.
Create a Firewall Rule Group for Anypoint MQ access
Get started with Anypoint MQ by using the tutorial to send messages to and retrieve messages from a queue. Create a simple application and deploy it in your Cloud Hub 2.0 private space. To allow connections to MQ, you can add an app-level egress rule:
- Add a new rule to allow egress to your Anypoint MQ instance
- Go back to Runtime Manager and click on Private Spaces
- Click on your Private Space to edit it
- Click on Firewall rules tab
- Add a new egress rule group by clicking on Create Rule Group
- Provide a Group Name and then click on Add Rule
- For Protocol, select HTTPS
- For Destination, select Custom Domains
- Allow HTTPS to anypoint.mulesoft.com
- Allow HTTPS to mq-us-east-1.anypoint.mulesoft.com
- Click on Update Egress Rules
- You need to allow traffic anypoint.mulesoft.com because that is the end point to verify the Client ID and Client Secret for your Anypoint MQ Instance. You also need to allow traffic to the Anypoint MQ instance, which in this case is “mq-us-east-1.anypoint.mulesoft.com”.
- This domain is specific to the region where you have created the Anypoint MQ Instance. You can find this from you MQ Connector URL, e.g. if MQ connector URL is https://mq-us-east-1.anypoint.mulesoft.com/api/v1/organizations/{{anypointOrgId}}/environments/{{anypointEnvId}}/, use value mq-us-east-1.anypoint.mulesoft.com.
- You need to allow traffic anypoint.mulesoft.com because that is the end point to verify the Client ID and Client Secret for your Anypoint MQ Instance. You also need to allow traffic to the Anypoint MQ instance, which in this case is “mq-us-east-1.anypoint.mulesoft.com”.
- Test your application by publishing messages to MQ and verifying that the messages are published
Create a Firewall Rule Group for Object Store access
Use the tutorial to set up Object Store V2. Create a simple application that uses Object Store and deploy it in your Cloud Hub 2.0 private space. To allow connections to OSv2, you can add an app-level egress rule:
- Create a new group or edit an existing group, then click on Add Rule
- For Protocol, select HTTPS
- For Destination, select Custom Domains
- Allow HTTPS to anypoint.mulesoft.com
- Allow HTTPS to object-store-us-east-1.anypoint.mulesoft.com
- Click on Update Egress Rules
- Test your application by storing and retrieving message to Object Store
Ready for takeoff
Now you’re prepared to set up egress control at the application level. Any application deployed to your CloudHub 2.0 private space will not be able to access any resource until the network or security administrator adds a Rule Group, enabling connections to allowed domains. To learn more about CloudHub 2.0, read through the extended documentation.