This is the second blog in our series about writing software for ChatOps. In the first post of this ChatOps series, we built a Webex bot that received and logged messages to its running console. In this post, we’ll walk through how to secure your Webex bot with authentication and authorization. Securing a Webex bot in this way will allow us to feel more confident in our deployment as we move on to adding more complex features.
[Access the complete code for this post on GitHub here.]
Very important: This post picks up right where the first blog in this ChatOps series left off. Be sure to read the first post of our ChatOps series to learn how to make your local development environment publicly accessible so that Webex webhook events can reach your API. Make sure your tunnel is up and running and webhook events can flow through to your API successfully before proceeding on to the next section. From here on out, this post assumes that you’ve taken those steps and have a successful end-to-end data flow. [You can find the code from the first post on how to build a Webex bot here.]
Need to catch up? Read the first part of Colin Lacy’s ChatOps series: “ChatOps: How to Build Your First Webex Bot”
How to secure your Webex bot with an authentication check
Webex employs HMAC-SHA1 encryption based on a secret key that you can provide, to add security to your service endpoint. For the purposes of this blog post, I’ll include that in the web service code as an Express middleware function, which will be applied to all routes. This way, it will be checked before any other route handler is called. In your environment, you might add this to your API gateway (or whatever is powering your environment’s ingress, e.g. Nginx, or an OPA policy).
How to add a secret to the Webhook
Use your preferred tool to generate a random, unique, and complex string. Make sure that it is long and complex enough to be difficult to guess. There are plenty of tools available to create a key. Since I’m on a Mac, I used the following command:
$ cat /dev/urandom | base64 | tr -dc '0-9a-zA-Z' | head -c30
The resulting string was printed into my Shell window. Be sure to hold onto it. You’ll use it in a few places in the next few steps.
Now you can use that string to update your Webhook with a PUT request. You can also add it to a new Webhook if you’d like to DELETE your old one:
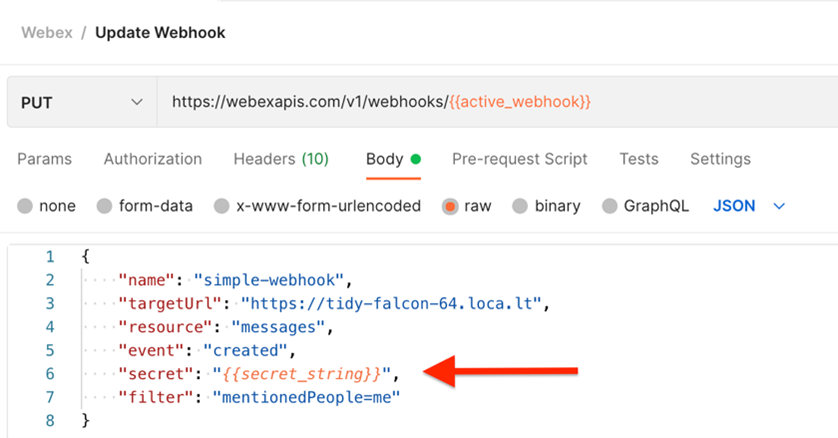
Webex will now send an additional header with each notification request under the header key x-spark-spark-signature. The header value will be a one-way encryption of the POST body, done with the secret value that you provided. On the server side, we can attempt the same one-way encryption. If the API client sending the POST request (ideally Webex) used the same encryption secret that we used, then our resulting string should match the x-spark-spark-signature header value.
How to add an application configuration
Now that things are starting to get more complex, let’s build out an application along the lines of what we can expect to see in the real world. First, we create a simple (but extensible) AppConfig class in config/appConfig.js. We’ll use this to pull in environment variables and then reference those values in other parts of our code. For now, it’ll just include the three variables needed to power authentication:
- the secret that we added to our Webhook
- the header key where we’ll examine the encrypted value of the POST body
- the encryption algorithm used, which in this case is ”sha1”
Here’s the code for the AppConfig class, which we’ll add as our code gets more complex:
// in config/appConfig.js
import process from 'process';

export class AppConfig {
    constructor() {
        this.encryptionSecret = process.env['WEBEX_ENCRYPTION_SECRET'];
        this.encryptionAlgorithm = process.env['WEBEX_ENCRYPTION_ALGO'];
        this.encryptionHeader = process.env['WEBEX_ENCRYPTION_HEADER'];
    }
}
Super important: Be sure to populate these environment variables in your development environment. Skipping this step can lead to a few minutes of frustration before remembering to populate these values.
Now we can create an Auth service class that will expose a method to run our encrypted string comparison:
// in services/Auth.js
import crypto from "crypto";

export class Auth {
    constructor(appConfig) {
        this.encryptionSecret = appConfig.encryptionSecret;
        this.encryptionAlgorithm = appConfig.encryptionAlgorithm;
    }

    isProperlyEncrypted(signedValue, messsageBody) {
        // create an encryption stream
        const hmac = crypto.createHmac(this.encryptionAlgorithm,
this.encryptionSecret);
        // write the POST body into the encryption stream
        hmac.write(JSON.stringify(messsageBody));
        // close the stream to make its resulting string readable
        hmac.end();
        // read the encrypted value
        const hash = hmac.read().toString('hex');
        // compare the freshly encrypted value to the POST header value,
        // and return the result
        return hash === signedValue;
    }
}
Pretty straightforward, right? Now we need to leverage this method in a router middleware that will check all incoming requests for authentication. If the authentication check doesn’t pass, the service will return a 401 and respond immediately. I do this in a new file called routes/auth.js:
// in routes/auth.js
import express from 'express'
import {AppConfig} from '../config/AppConfig.js';
import {Auth} from "../services/Auth.js";

const router = express.Router();
const config = new AppConfig();
const auth = new Auth(config);

router.all('/*', async (req, res, next) => {
    // a convenience reference to the POST body
    const messageBody = req.body;
    // a convenience reference to the encrypted string, with a fallback if the value isn’t set
    const signedValue = req.headers[config.encryptionHeader] || "";
    // call the authentication check
    const isProperlyEncrypted = auth.isProperlyEncrypted(signedValue, messageBody);
    if(!isProperlyEncrypted) {
        res.statusCode = 401;
        res.send("Access denied");
    }

    next();
});

export default router;
All that’s left to do is to add this router into the Express application, just before the handler that we defined earlier. Failing the authentication check will end the request’s flow through the service logic before it ever gets to any other route handlers. If the check does pass, then the request can continue on to the next route handler:
// in app.js

import express from 'express';
import logger from 'morgan';
// ***ADD THE AUTH ROUTER IMPORT***
import authRouter from './routes/auth.js';
import indexRouter from './routes/index.js';

// skipping some of the boilerplate…

// ***ADD THE AUTH ROUTER TO THE APP***
app.use(authRouter);

app.use('/', indexRouter);

// the rest of the file stays the same…
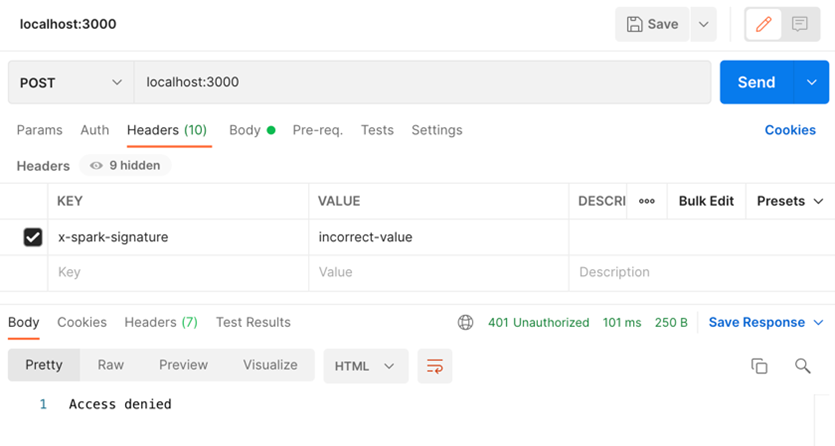
Now if you run your server again, you can test out your authentication check. You can try with just a simple POST from a local cURL or Postman request. Here’s a cURL command that I used to test it against my local service:
$ curl --location --request POST 'localhost:3000' \
--header 'x-spark-signature: incorrect-value' \
--header 'Content-Type: application/json' \
--data-raw '{
    "key": "value"
}'
Running that same request in Postman produces the following output:
Now, if you send a message to your bot through Webex, you should see the Webhook event flow through your authentication check and into the route handler that we created in the first post.
How to add optional authorization
At this point, we can rest assured that any request that comes through came from Webex. But that doesn’t mean we’re done with security! We might want to restrict which users in Webex can call our bot by mentioning it in a Webex Room. If that’s the case, we need to add an authorization check as well.
How to check against a list of authorized users
Webex sends user information with each event notification, indicating the Webex user ID and the corresponding email address of the person who triggered the event (an example is displayed in the first post in this series). In the case of a message creation event, this is the person who wrote the message about which our web service is notified. There are dozens of ways to check for authorization – AD groups, AWS Cognito integrations, etc.
For simplicity’s sake, in this demo service, I’m just using a hard-coded list of approved email addresses that I’ve added to the Auth service constructor, and a simple public method to check the email address that Webex provided in the POST body against that hard-coded list. Other, more complicated modes of authz checks are beyond the scope of this post.
// in services/Auth.js
export class Auth {
    constructor(appConfig) {
        this.encryptionSecret = appConfig.encryptionSecret;
        this.encryptionAlgorithm = appConfig.encryptionAlgorithm;
        // ADDING AUTHORIZED USERS
        this.authorizedUsers = [
           "colacy@cisco.com" // hey, that’s me!
        ];
    }

    // ADDING AUTHZ CHECK METHOD
    isUserAuthorized(messageBody) {
        return this.authorizedUsers.indexOf(messageBody.data.personEmail)
!== -1
    }
// the rest of the class is unchanged
Just like with the authentication check, we need to add this to our routes/auth.js handler. We’ll add this between the authentication check and the next() call that completes the route handler.
// in routes/auth.js
// …

    const isProperlyEncrypted = auth.isProperlyEncrypted(signedValue, messageBody);
    if(!isProperlyEncrypted) {
        res.statusCode = 401;
        res.send("Access denied");
        return;
    }

    // ADD THE AUTHORIZATION CHECK
    const isAuthorized = auth.isUserAuthorized(messageBody);
    if(!isAuthorized) {
        res.statusCode = 403;
        res.send("Unauthorized");
        return;
    }

    next();
// …
If the sender’s email address isn’t in that list, the bot will send a 403 back to the API client with a message that the user was unauthorized. But that doesn’t really let the user know what went wrong, does it?
User Feedback
If the user is unauthorized, we should let them know so that they aren’t under the incorrect assumption that their request was successful — or worse, wondering why nothing happened. In this situation, the only way to provide the user with that feedback is to respond in the Webex Room where they posted their message to the bot.
Creating messages on Webex is done with POST requests to the Webex API. [The documentation and the data schema can be found here.] Remember, the bot authenticates with the access token that was provided back when we created it in the first post. We’ll need to pass that in as a new environment variable into our AppConfig class:
// in config/AppConfig.js
export class AppConfig {
    constructor() {
        // ADD THE BOT'S TOKEN
        this.botToken = process.env['WEBEX_BOT_TOKEN'];
        this.encryptionSecret = process.env['WEBEX_ENCRYPTION_SECRET'];
        this.encryptionAlgorithm = process.env['WEBEX_ENCRYPTION_ALGO'];
        this.encryptionHeader = process.env['WEBEX_ENCRYPTION_HEADER'];
    }
}
Now we can start a new service class, WebexNotifications, in a new file called services/WebexNotifications.js, which will notify our users of what’s happening in the backend.
// in services/WebexNotifications.js

export class WebexNotifications {
    constructor(appConfig) {
        this.botToken = appConfig.botToken;
    }

    // new methods to go here

}
This class is pretty sparse. For the purposes of this demo, we’ll keep it that way. We just need to give our users feedback based on whether or not their request was successful. That can be done with a single method, implemented in our two routers; one to indicate authorization failures and the other to indicate successful end-to-end messaging.
A note on the code below: To stay future-proof, Iʼm using the NodeJS version 17.7, which has fetch enabled using the execution flag –experimental-fetch. If you have an older version of NodeJS, you can use a third-party HTTP request library, like axios, and use that in place of any lines where you see fetch used.
Weʼll start by implementing the sendNotification method, which will take the same messageBody object that weʼre using for our auth checks:
// in services/WebexNotifications.js…
// inside the WebexNotifications.js class

   async sendNotification(messageBody, success=false) {
       // we'll start a response by tagging the person who created the message
       let responseToUser =
`<@personEmail:${messageBody.data.personEmail}>`;
       // determine if the notification is being sent due to a successful or failed authz check
       if (success === false) {
           responseToUser += ` Uh oh! You're not authorized to make requests.`;
       } else {
           responseToUser += ` Thanks for your message!`;
       }
       // send a message creation request on behalf of the bot
       const res = await fetch("https://webexapis.com/v1/messages", {
           headers: {
               "Content-Type": "application/json",
               "Authorization": `Bearer ${this.botToken}`
           },
           method: "POST",
           body: JSON.stringify({
               roomId: messageBody.data.roomId,
               markdown: responseToUser
           })
       });
       return res.json();
   }
Now it’s just a matter of calling this method from within our route handlers. In routes/auth.js we’ll call it in the event of an authorization failure:
// in routes/auth.js

import express from 'express'
import {AppConfig} from '../config/AppConfig.js';
import {Auth} from "../services/Auth.js";
// ADD THE WEBEXNOTIFICATIONS IMPORT
import {WebexNotifications} from '../services/WebexNotifications.js';

// …

const auth = new Auth(config);
// ADD CLASS INSTANTIATION
const webex = new WebexNotifications(config);

// ...

    if(!isAuthorized) {
        res.statusCode = 403;
        res.send("Unauthorized");
        // ADD THE FAILURE NOTIFICATION
        await webex.sendNotification(messageBody, false);
        return;
    }
// ...
Similarly, we’ll add the success version of this method call to routes/index.js. Here’s the final version of routes/index.js once we’ve added a few more lines like we did in the auth route:
// in routes/index.js

import express from 'express'
// Add the AppConfig import
import {AppConfig} from '../config/AppConfig.js';
// Add the WebexNotifications import
import {WebexNotifications} from '../services/WebexNotifications.js';

const router = express.Router();
// instantiate the AppConfig
const config = new AppConfig();
// instantiate the WebexNotification class, passing in our app config
const webex = new WebexNotifications(config);

router.post('/', async function(req, res) {
  console.log(`Received a POST`, req.body);
  res.statusCode = 201;
  res.end();
  await webex.sendNotification(req.body, true);
});

export default router;
To test this out, I’ll simply comment out my own email address from the approved list and then send a message to my bot. As you can see from the screenshot below, Webex will display the notification from the code above, indicating that I’m not allowed to make the request.

If I un-comment my email address, the request goes through successfully.

Conclusion
Wow, that covered a lot in a short amount of code. Now we have an end-to-end working setup for ChatOps, with built-in security. We can start thinking about all the different workflows that we’d like to enable for things like:
- DevOps automation
- Role-based workflows
- Agile practices for remote teams
- And anything else you can think of!
This is only the second in a series of blog posts about ChatOps. Now that we have secured our Webex bot, we have a great jump-off point for building complex workflows that can automate a lot of downstream processes. As we cover more topics, we’ll post those here, so check back often!
Follow Cisco Learning & Certifications
Twitter, Facebook, LinkedIn and Instagram.


CONNECT WITH US