Welcome to the first blog of our series on how to use the Webex API to code up ChatOps workflows! In this post, you’ll learn how to create a Webex bot, register a Webhook in Webex, and configure your bot to listen to Webhook – all with plenty of code examples. Check back for more as we build new use cases that leverage different aspects of automation using chat-driven interfaces.
In the DevOps world, we’re always looking for new ways to drive automation around communication. When we deploy new code, scale our deployments, or manage our feature flags – we want our teams to know about it. The Webex API makes it easy to build announcement flows triggered by successful events in our infrastructure. However, if we can trigger those events from Webex as well, then we’ve entered the world of ChatOps.
ChatOps is the use of chat clients like Webex Teams, chatbots, and real-time communication tools to facilitate how software development and operation tasks are communicated and executed. Using Webex APIs, we can build bots that allow us to enter commands that manage our infrastructure, trigger approval workflows, deploy code, and much more.
Security Disclaimer
Security is a top concern here at Cisco. In normal application development, security should always be built into the initial steps of getting code up and running. Today, we’re going to keep it simple and focus on the basics. Then, we’ll cover how to authenticate and authorize Webhook requests. We’ll hold off on security until the next blog post in our ChatOps series, once we’ve proven an end-to-end connection.
How to create a Webex bot
First, let’s create a Webex bot using the Webex Developer UI.

Webex for Developers has a great step-by-step guide here to help you get up and running.
Some important things to consider:
- Think about what you want to name your bot. It should be intuitive, but unique. Depending on how you set up your Webhook, you may be typing the bot’s name a lot, so take that into account.
- The secret token that’s auto-generated for your bot is used for authenticating with the Webex API. When you use this token, Webex will treat your bot like a real user who can create messages, join rooms, or be tagged by other users.
- Will this bot interact with a lot of people? Will it have a very public presence, or will it only communicate with a few users? The answer to that question may have an impact on how you want to name it, what icon you select, etc.
Once you’ve taken all of that into account and filled out the bot creation form, you should see something like this, which includes the all-important access token:

How to receive Webhook Events locally
Next, you’ll need to host your bot where it can be accessed by Webex via API calls. If you’re developing locally and want to run a server that’s accessible to the internet, the Webex guide recommends localtunnel.me or ngrok. I went with localtunnel.me for my local environment.
$ npm i -g localtunnel
$ lt --port 3000
The resulting output is the public domain name that you can use to tunnel through to a local port on your machine:
![]()
Note: If you’re having trouble running localtunnel via the command line after installing (as a few people have reported here), make sure your PATH includes the directory where NPM installs your binaries. For example, on a Mac, that’s /usr/local/bin. This command might help:
$ npm config set prefix /usr/local
$ npm i -g localtunnel
$ lt --port 3000
How to register a Webhook
Once your internet-accessible endpoint has been set up, you now have a domain that you can use to register a Webex Webhook. Your Webex Webhook will listen to specific events that take place within the Webex platform and notify your web service via HTTP POST requests.
There are multiple ways to register a webhook. Under the hood, however, they all boil down to making your own HTTP POST request. I’ve posted a Postman collection that you can use to make this process a little easier. Fill in your own environment’s variables as you go and include the access token used in the header.
This is what my Postman request looks like:
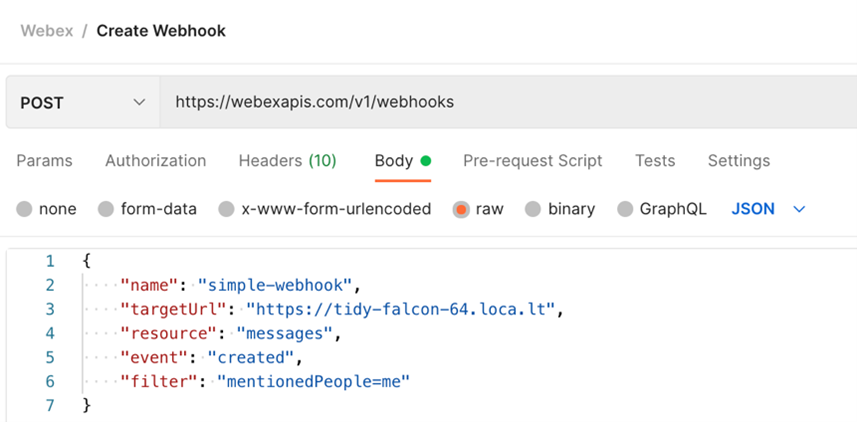
Feel free to use whatever technology you like, including good old-fashion CURL:
curl --location --request POST 'https://webexapis.com/v1/webhooks' \
--header 'Authorization: Bearer $BOT_TOKEN \
--header 'Content-Type: application/json' \
--data-raw '{
    "name": "simple-webhook",
    "targetUrl": "https://tidy-falcon-64.loca.lt",
    "resource": "messages",
    "event": "created",
    "filter": "mentionedPeople=me"
}'
What’s important to note, is that Webex will send notifications to the domain that you specify in your POST request. If you’re using a tunnel into your local environment, list the domain that was given to you when you activated your proxy.
A very impactful part of your Webhook will be the filter property. This determines which Webex events are sent to your bot as notifications (and which are filtered out). To keep things simple, my bot is only notified when users send a message that specifically mentions it in a Webex Teams Room:

Webex has a nice, convenient tag for this: me uses the authorization token from the request to determine the identity of the user making that request (in this case, our bot), and applies that identity wherever it sees me referenced.
Alternatively, you can set a filter that only triggers notifications for direct messages to your bot, as opposed to mentions in Webex rooms. Since the goal of this post is to broaden visibility into the various processes, these examples show interactions in a Webex Teams Room, however, both are equally viable options.
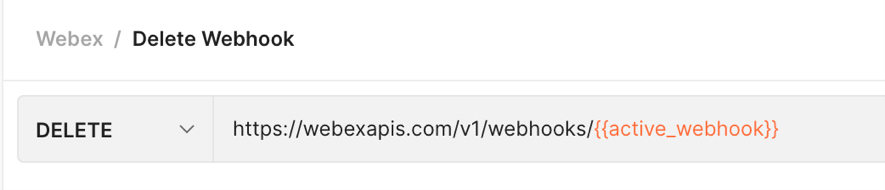
When you send your POST request, Webex will respond with a body that contains an ID for your Webhook. While you can use the Webex API to GET a list of your Webhooks, it might be a good idea to hold onto this, in case you want to quickly update or delete this Webhook in the future. The Postman collection linked above stores the most recently created Webhook ID in an active_webhook environment variable automatically, which then powers the DELETE call in that collection.
How to create your bot server
For simple use cases, you may want to use the Webex Node Bot Framework, which is great for quick implementation. In order to get more familiar with the different components involved in this series, we’ll start from scratch, diving into the step that powers your Webex bot.
Getting Started with Express
Let’s set up a web server that can listen for POST requests from the Webex Webhook that we’ll create in a minute. This doesn’t have to be complicated for now, just something to demonstrate that we’re able to receive requests. For simplicity, we can use the ExpressJS generator, but you can use any web framework or technology that you like.
$ npm i -g express-generator
$ cd where/you/want/your/project
$ express
Since my IDE handles JavaScript Modules a lot better than it handles require statements, I opted to go with a more modern approach for my dependency management. This is totally optional and has no bearing on how you set up your code. However, if you want to follow the code snippets as I’ve laid them out, you’ll want to do the same. The first step is to add the following key/value pair to your package.json file, anywhere in the root of the JSON object:
"type": "module",
A lot of the boilerplate code can be stripped out if you like – we won’t need a favicon, a public/ folder, or a users route handler. Here’s what my code looked like after I stripped a lot of the simple stuff out:
// in app.js

// notice that I changed the require statements to use JS modules import statements
import express from 'express';
import logger from 'morgan';
import indexRouter from './routes/index.js';

const app = express();
app.use(logger('dev'));
app.use(express.json());
app.use(express.urlencoded({ extended: false }));

app.use('/', indexRouter);

// boilerplate error code didn’t change
// …

// **be sure to remember to set app as the default export at the end of the file**
export default app;
Since I’m using JS Modules, I also had to change the executed file in an Express app www/bin to www/bin.js, and revise the boilerplate require statements there as well to use import syntax:
// in www/bin.js

/**
* Module dependencies.
*/

import app from '../app.js';
import _debugger from 'debug';
const debug = _debugger('chatops-webhook:server');
import http from 'http';

// nothing else in this file needed to change
Adding a Route Handler
That takes care of the majority of the boilerplate. At this point, I only have four files in my codebase, despite how many Express gives me out of the box:
- app.js
- package.json
- bin/www.js
- routes/index.js
We’ll want to add a route handler that lets us know when we’ve received a POST request from our Webex Webhook. It can be a simple function that prints the request body to the application console – nothing complicated, just a few lines of code:
// in routes/index.js

import express from 'express'

const router = express.Router();

router.post('/', async function(req, res) {
  console.log(`Received a POST`, req.body);
  res.statusCode = 201;
  res.end();
});

export default router;
Give it a try
You now have all of the important components for receiving message notifications from Webex:
- A bot to act as an identity for your Webex interactions
- If applicable, a network tunnel to expose your local web service to the public internet
- A Webhook set up by your bot to receive Webex notifications
- A web service to receive Webex notifications on a POST endpoint
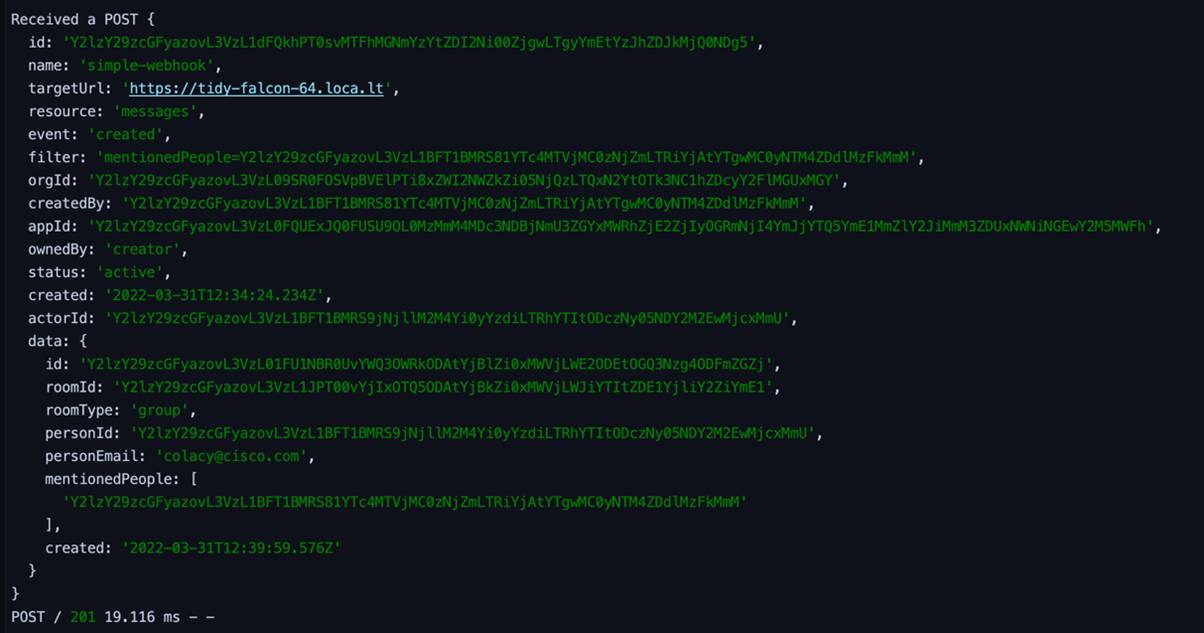
Let’s test it out! To keep things simple for now, create a new room in Webex Teams and add your bot as a member. Next, start typing your message, mentioning your Bot (you can use the @ symbol or type its name) as part of the text. When you hit enter, after a brief pause, you should see a request come through to your running web service, which should log the POST body that it received in its console output:
Congratulations, you’ve just set up your very own Webex bot!
What’s next
As promised, our next post will walk through the extremely important aspect of securing our bot. We’ll make sure that only Webex can access it and only authorized users can trigger automation. After that, we’ll move on to new and exciting ways that you can automate everyday workflows right from a Webex Teams Room!
Learn, train, and certify in Cisco Collaboration
As you make your way through this ChatOps series, consider validating your skills with a Cisco Certification.
The 300-835 CLAUTO: Automating and Programming Cisco Collaboration Solutions is a 90-minute exam that counts toward three certifications — the CCNP Collaboration, Cisco Certified DevNet Professional, and Cisco Certified DevNet Specialist – Collaboration Automation and Programmability certifications. Check out the CLAUTO exam topics, and you’ll find that 25% of the exam covers Cloud Collaboration technologies. Before we meet again, take some time to browse through the free CLAUTO Study Materials available on the Cisco Learning Network, which will help you solidify today’s ChatOps focus on building your first Webex bot.
Did you build a Webex bot? I’d love to hear how it went. Leave me a comment below and let me know what you think!
Follow Cisco Learning & Certifications
Twitter, Facebook, LinkedIn and Instagram.


CONNECT WITH US