Most advertising campaigns suffer from high customer acquisition costs.
It doesn’t matter how ambitious your goals are for your Google Shopping campaigns, if their return isn’t there, your campaigns won’t scale.
A lot of the store owners want to spend more money on advertising campaigns, but they don’t because the return isn’t there.
If you try to improve your Shopping campaigns within the Google Ads interface, you quickly run out of things to do. That’s because it seems that you only have 1 lever to play with: increase or decrease the CPC of a brand, category or product.
But what if that’s not enough?
What if you’re getting clicks and sales from your campaigns, but just not enough to make the numbers work? Let alone increase your budget.
The key is to focus on the products that do sell and do give you a good margin.
That might seem like a no-brainer, but the standard Google Shopping setup doesn’t allow that flexibility.
Enter Google Shopping Custom Labels
The answer to this are custom labels. These are extra fields that you put in your product feed. And they will allow you to organize your Google Shopping campaigns in a way that takes the business side of things into account.
Custom labels are one of my go-to optimization tactics that I use if I need to get better results for my clients with Google Shopping.
So in this post, we’ll focus on how to use custom labels in your Google Shopping campaigns.
Custom Labels Case Study
The set up of the actual custom label can get pretty technical. So before we dive in, I want to show what’s possible if you get this right. These are the results that one of my clients accomplished recently:
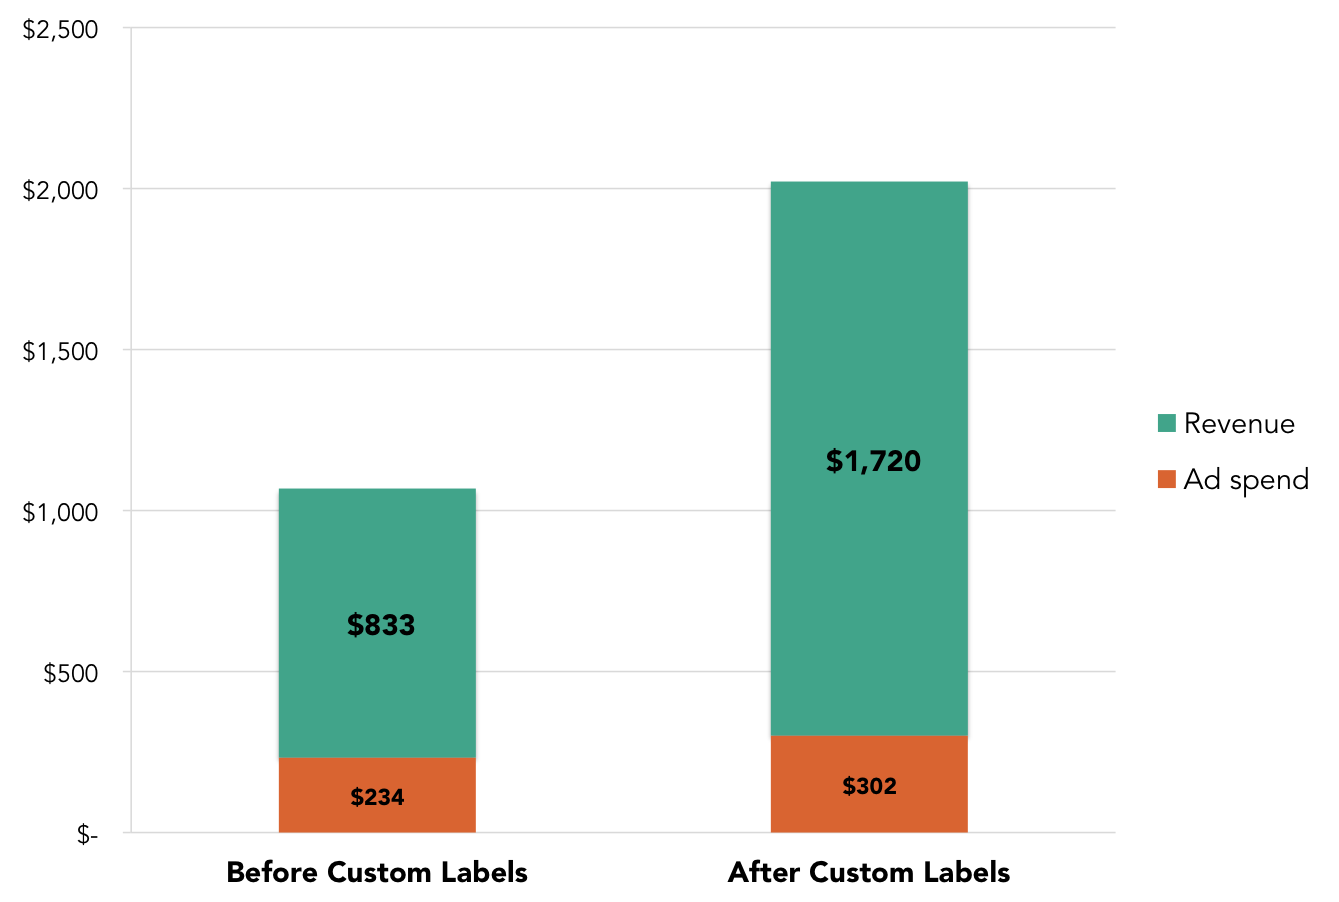
| Before | After | |
| Transactions | 16 | 17 |
| Ad spend | $234 | $302 |
| Revenue | $832.98 | $1720.2 |
| CPA | $14.62 | $17.76 |
| AOV | $52 | $101 |
| ROAS | 3.5 | 5.7 |
In this case, the CPA (cost per action or sale) increased by 20%, but the AOV (average order value) almost doubled. That’s because this client is using the custom labels to target products at higher price points. On top of that, they also focused on products with a high margin. This means that after the changes, revenue not only grew but a lot more profits were generated.
In the rest of the article, I’m going to share the exact steps on how to implement custom labels in your campaigns. Here are the different sections:
- Segment your products
- Creating custom labels
- Add custom labels to your Google Shopping feed
- Restructure Google Shopping campaigns
- 🤑
Let’s look at each of those steps separately and see how you can apply them to your own campaigns. Or check here for more case studies.
Step 1: Segment Your Products
The problem with lumping all products together in one campaign is that Google Shopping will treat every product as equal.
It does not distinguish between products on price, popularity, margins, profit, and seasonality.
But for you as a business owner, not all products are equal. Some are interesting to sell via Google Shopping, while others don’t have enough margin to be profitable.
If a certain product is in high demand (= high number of clicks), but your margin on it is low, it’s key to know exactly how much you can afford to pay for each click.
If you don’t get it right, one of two things will happen:
- you set your max CPCs too high which will cause your cost to outpace your revenue
- you set your max CPCs too low which will cause your Shopping ads to only get a handful impressions or clicks
Let’s look at the example of a fitness store. This store sells two kinds of foam rollers (A foam roller helps to massage your muscles after a workout. It’s a devilish tool but feels great after 🙂
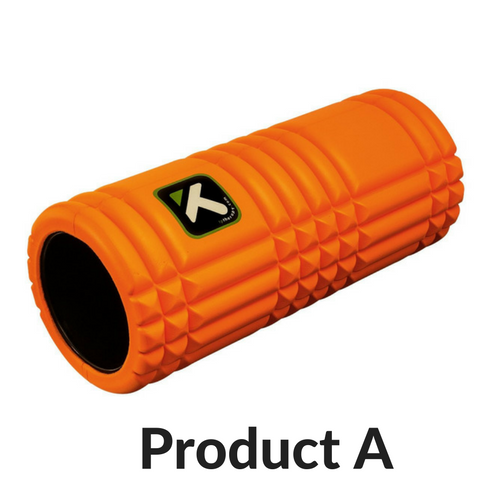
Let’s say product A sells for $45 and you’ve got a 10% gross margin on it. That means you’ve got $4.5 in gross profit.
This particular product converts at 3%, meaning that you need to send 30 visitors to this page to make 1 sale.
That means you can break even if we pay $0.15 / click or less. This would be a very low CPC for a popular product like this, one we’re unlikely to hit.
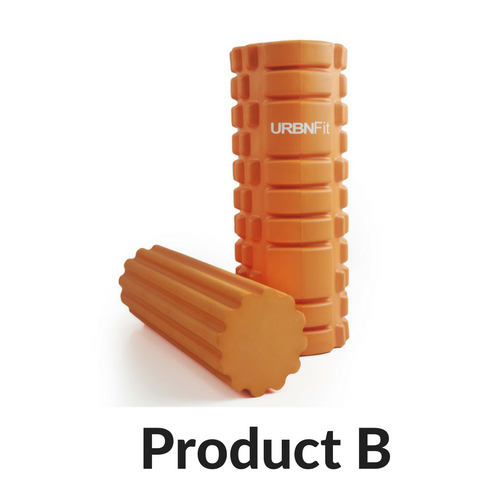
Product B sells for $35 with a 40% gross margin. That means you make $14 in gross profit on each sale.
The conversion rate is the same: 3%. That means you can break even if you spend $0.46 / click or less. This CPC gives a little more room.
So if you were this retailer, your bid will be very different for these two products.
Let’s look at some other ways of how you could segment your product catalog:
- Margin: the higher your margin, the more you can afford to spend for a sale
- Price: in absolute numbers, you’ll make more profit on higher priced items
- Seasonality: you want to push products when people are buying them
- Sales performance: push the products that are more likely to sell
Which of the above you use to divide your products depends on your business.
Step 2. Creating Custom Labels
Up until now, you might be thinking that you can already increase or decrease the CPCs of a product already. So why do you need custom labels?
It’s hard to keep track of the margin and price of a specific product while you are in the Google Ads interface.
Adding this logic to your campaigns from your head is prone to error. Plus if you don’t have helpful IDs, that approach is doomed to failure:
Custom labels make it a lot easier to group together products in product groups based on price or profitability.
So for some advertisers, that means a complex structure with 5 different price brackets and 3 different margin brackets. Resulting in 15 levels to set the correct max CPCs.
Others might benefit from 2 simple groups: is this product interesting, yes or no? Interesting in this case could mean a mix of all of the options mentioned above.
The basic rule is to make sure that the time you spend segmenting all your products (and implementing it) will be worth it in the and. You can start out with a couple of big groups and refine your approach as you see your campaigns evolve and generate better returns.
In what follows, things get more complex, so it’s good to keep our goal in mind: identify the products that make you the most revenue/profit to allow you to bid more aggressively on them.
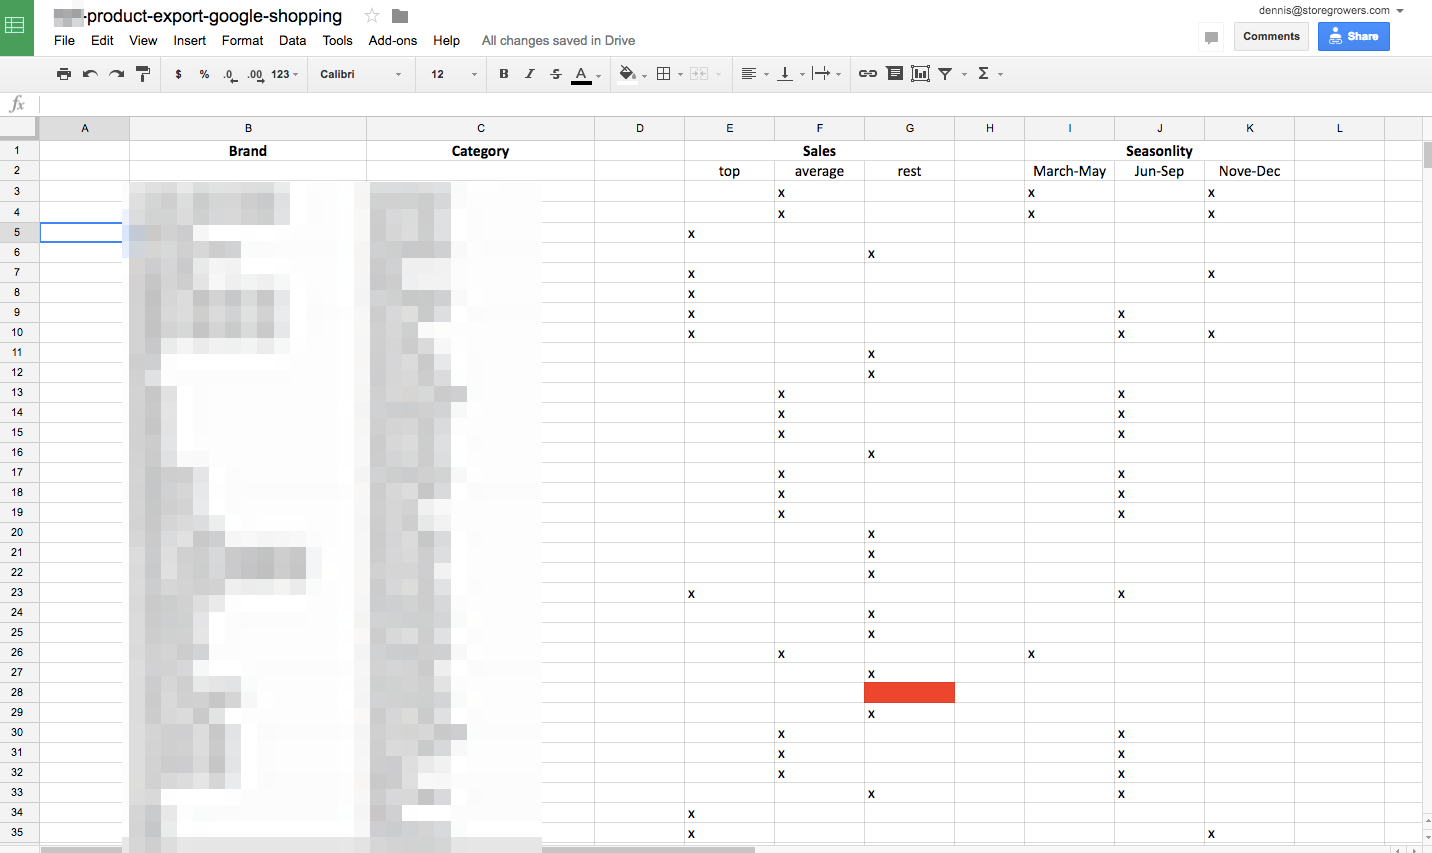
In practice I do it like this:
- Export all products
- Get them into a spreadsheet
- Pivot table them to group brands or brand+category together.
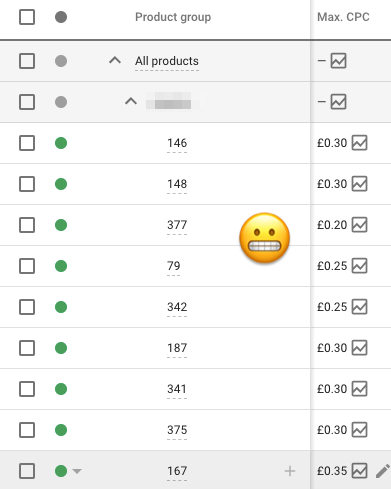
- Add the product characteristics (margin and sales performance in the screenshot below)
Step 3: Add Custom Labels to Your Shopping Feed
Once you’re finished segmenting your products in a spreadsheet based on your chosen product characteristics, you need to add this information to the product feed that you send to Google.
Google Shopping has 5 custom labels that you can use for this. Usually, you’ll reserve 1 label for the price, one for seasonality and another for margin.
An example of what that can look like:
- Custom_label_0: price (values: $9-$49 / $50-$99 / $100-$199 / $200 )
- Custom_label_1: margin (values: 20% / 21%-30% / 50%)
Note that you don’t need to “define” your custom label, just start pushing values into one of them and stay consistent.
There are 3 options to add these custom labels to your product feed:
- Add extra fields on your ecommerce platform (free – labor-intensive)
- Create Feed Rules in Google Merchant Center (free)
- Create rules with data feed management tools (paid)
Which method or tool you use will depend a lot on how you’ve created your google shopping feed in the first place.
Let’s take a quick look at how to get started with all of these 3 methods.
1. Your Ecommerce Platform
Most ecommerce platforms have the option to create extra fields for your products. That means you (or a developer if you’re not super technical) could create separate fields for price bracket, margin, seasonality, etc.
The major downside to this approach is that you will have to enter this information for every single product. Which means a lot of manual labor.
2. Feed Rules in Google Merchant Center
Feed Rules allow you to create rules based on specific information in your product feed.
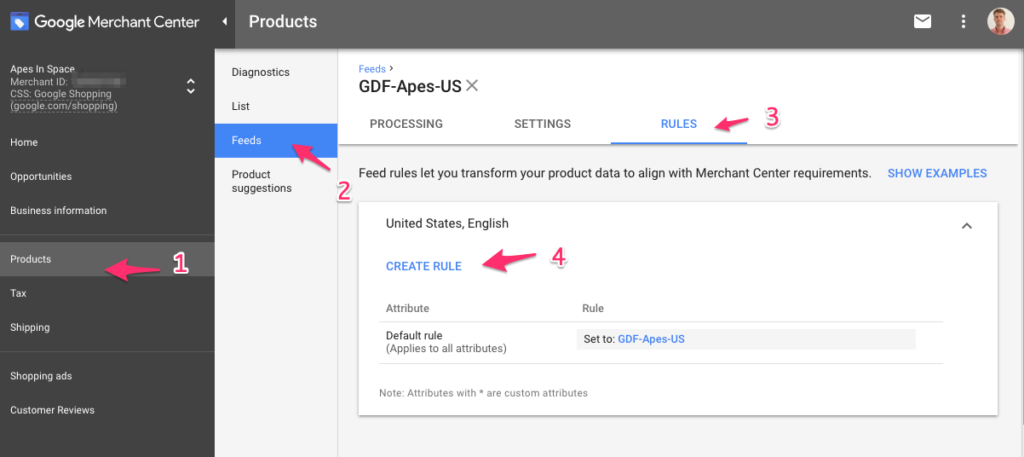
That means you could, for example, create a rule that does the following:
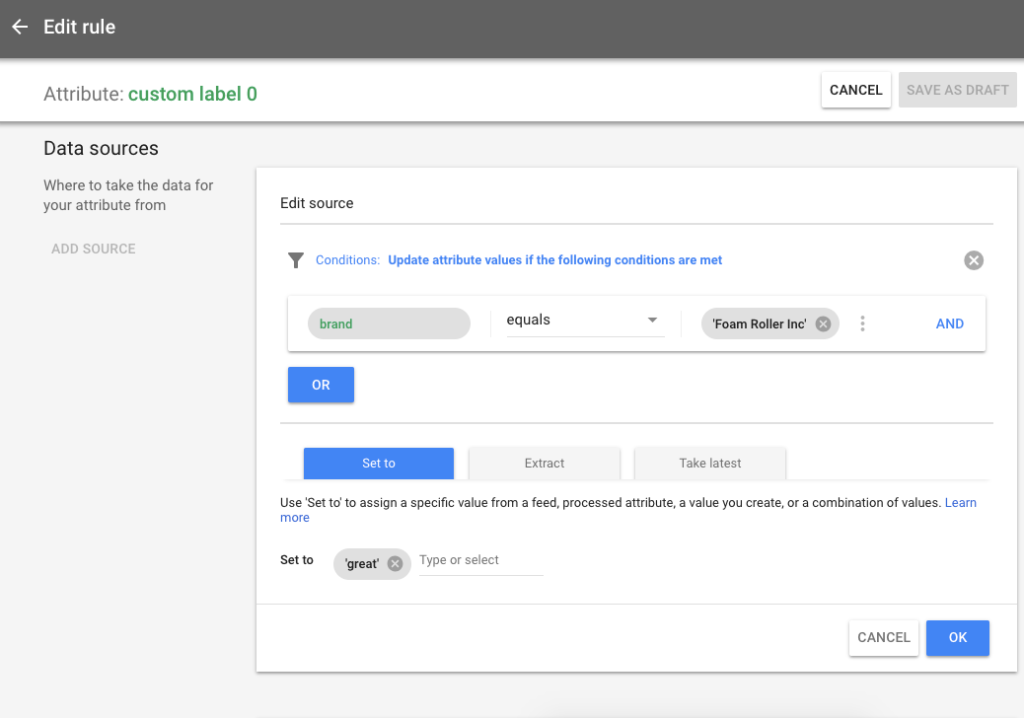
If brand = “Foam Roller Inc”, set custom_label_0 to great (let’s assume custom label 0 refers to margin).
That looks something like in Google Merchant Center:
3. Data Feed Tools
Your third option is to create rules in your data feed management software. A lot of stores already use tools like GoDataFeed, Shopping Feed or Channable.
The product feeds that they generate often use a lot of these rules.
Step 4: Restructure Your Google Shopping Campaigns
When your product feeds are updated with your business logic, it’s time to reorganize your Google Shopping campaigns.
You can use the custom labels to subdivide existing campaigns into more fitting product groups, break out different ad groups or create new campaigns.
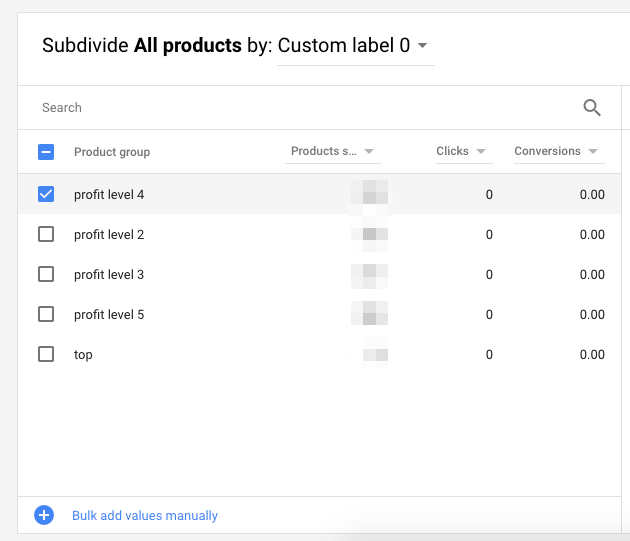
Your exact implementation will depend on the complexity of the information that you’ve added to your custom labels.
For the client mentioned in the case study at the start, we’ve set up 3 different campaigns:
- Top products (75% of Shopping budget & aggressive max CPCs)
- Average products (20% of budget & average CPCs)
- Rest products (5% of budget & very low CPCs)
Depending on which campaign a product is in, it has a specific max CPC range. The rest campaign, for example, has a max CPC of $0.05 while the top product’s campaign starts at $0.5 and will scale up as long as it is profitable.
Step 5: 🤑
That’s it. If you’ve followed the steps above, the campaigns that you’ve got running should make a lot more sense to your business. They will bring in more revenue or profit or lower the amount of wasted ad spend.
If your numbers improve but you’re still outside of the realm of profitability, you will need to get more granular and split up your campaigns even further.

[…] the basic Google Shopping setup won’t be sufficient to get an optimal ROI. If you add custom labels to your product feed you’re able to filter more specifically which products to show based on things like […]
[…] you can add custom labels to your campaigns to make sure you’re pushing the most interesting products (= margin/volume/price/..) the […]
[…] or on a product level. If you want to set the bid according to margin, you’ll need to use custom labels to add that information to your product […]
[…] Optimize your feed with things like custom labels […]
You’re awesome, Dennis! Spending hours on your website reading the articles on Google Shopping. We have a marketplace which makes it all a littlre bit trickier and harder with Google Shopping, since the users post photos of different quality and name their products the way they want it
Thanks for the kind words Anton 🙂
You’re right, that’s an extra complexity. How does your business model currently integrate Google Shopping?
Is it a (paid) add-on for vendors on the platform? Or do you absorb the cost as a way to drive traffic to the platform (and enable it for all vendors)?
Depending on the answers and effectiveness of Google Shopping on the listings with “good” photos you’ve got a couple of options:
Boa sorte!
Are you doing that in one shopping campaign with different CPC, or you make 3 different campaigns with adding a zero cpc to the products which you want to exclude from a specific campaign?
Hi Andrew,
Both options are possible.
Using custom labels in a single campaign is helpful to help set bids more accurately.
Using custom labels to create specific campaigns helps to allocate a specific budget for a specific product group.
One comment on excluding products: use the exclude option instead of setting very low bids (don’t think you can get away with a $0.00).
Top notch article Dennis, wow! Would you suggest using a query level bidding/shared budget campaign when using custom labels?
Thanks TJ!
Yeah that’s one of the most common applications for it!